DIY Acoustic Diffuser: Step-by-step Guide
Do you have a room in your house that just never seems to sound quite right? Maybe the echo is really bad or the overall sound quality is just not up to par. You may think that you need to purchase an expensive acoustic panel to fix the problem, but did you know that you can make your own acoustic diffuser for a fraction of the price? In this step-by-step guide, we will show you how to make an acoustic diffuser using materials that you can find at the nearest store!

What is an Acoustic Diffuser? Is it the same that a Sound Diffuser?
An acoustic diffuser is a device that absorbs sound waves and disperses them in a manner that reduces echo and reverberation. Sound diffusers, on the other hand, are devices that reflect sound waves in order to create a more evenly dispersed sonic environment. Both devices serve important purposes in audio engineering and can be used together to create an optimal listening experience.
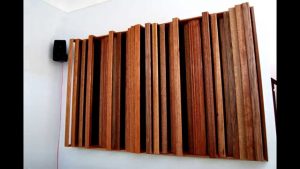
A diffuser absorbs sound while also absorbing echo and dispersing resonance throughout a space, bringing it to life in the same way as nature does. The room no longer sounds lifeless or hollow. It may even make a little area seem big. Diffusers can be placed on walls opposite speakers or on ceilings. They are an excellent way to improve sound and reduce resonance worries in any space.
Making your own Acoustic Diffuser: Step-by-step Guide
So, how does one go about making their own acoustic diffuser? We’ve put together a step-by-step guide below that will walk you through the process of creating your very own acoustic diffuser!
Step one: Choose material.
The first step in making your own acoustic diffuser is to choose the material that you will use. There are a variety of materials that can be used for this purpose, but we recommend using something that is lightweight and has a good amount of surface area. Some examples of materials that would work well include egg cartons, cardboard boxes, or even styrofoam packing peanuts.
Once you have chosen your material, it’s time to move on to step two!
Step two: Choose the placement.
The next step in making your own acoustic diffuser is to choose the placement for your diffuser. This is an important step, as the placement of your diffuser will determine how effective it is at reducing echo and reverberation. We recommend placing your diffuser near the source of the sound, such as a speaker or amplifier.
Step three: Calculate the frequency range you want to diffuse.
Now that you have your diffuser assembled, it’s time to calculate the frequency range you want to diffuse. This can be done by following the instructions below:
– Choose the frequency at which you want your diffuser to begin diffusing sound. This is typically a lower number, such as 125 Hz.
– Choose the frequency at which you want your diffuser to stop diffusing sound. This is typically a higher number, such as 4000 Hz.
– Calculate the difference between these two numbers. This will give you the range of frequencies that your diffuser will need to be effective for.
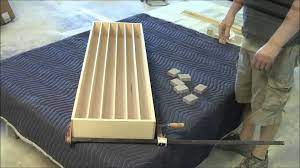
Step four: Make a Quadratic-Residue Diffuser.
The third and final step in making your own acoustic diffuser is to create a quadratic-residue diffuser. This can be done by following the instructions below:
Material and tools needed for a QRD:
- A piece of wood that is at least 24 inches long and 12 inches wide
- A saw
- A drill
- A jigsaw
- Sandpaper
- Paint or a sealant (optional)
Instructions:
- Cut the piece of wood into four equal pieces using the saw.
- Drill two holes in each piece of wood, making sure that the holes are evenly spaced.
- Use the jigsaw to cut out a square from each piece of wood.
- Sand down the edges of each piece of wood until they are smooth.
- Paint or seal the diffuser (optional).
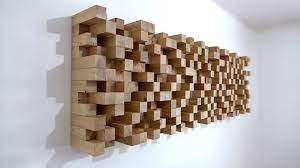
You can also make 2D Quadratic-Residue Diffuser or Skyline diffuser. Now that you know how to make your own acoustic diffuser, you can experiment with different designs and materials to find the perfect diffuser for your needs. You can also make a two-dimensional quadratic-residue diffuser or skyline diffuser with a little searching through the DIY internet websites.
And that’s it! You’ve now made your very own acoustic diffuser! We hope you found this guide helpful and that your new diffuser helps to improve the sound quality in your home. Thanks for reading!