DIY Soundproof Booth: a Step-by-Step Guide, by AI
In a world where enthusiasts are scripting SEO magic in Python or orchestrating symphonies with 3D printers, it’s high time we turn to our AI pals for a bit of guidance on a more, shall we say, down-to-earth project – why not ask artificial intelligence how to create a soundproof booth for your home?
Now, imagine being a working mom, juggling a flurry of responsibilities while orchestrating a symphony of tasks. In this dynamic dance of chaos and order, the allure of a peaceful sanctuary becomes more than just a luxury – it’s a necessity. Now, don’t get me wrong – while the internet is overflowing with promising DIY tutorials and how-to videos, who really has the time for trial and error?
Whether it’s that elusive phone call you need to take, the deep dive into a focused work task, or simply relishing a few moments of introspection, the notion of having a dedicated space that shields you from the world’s clamor isn’t just a fleeting desire – it’s a deeply resonating need for many. So, it was with this conviction that I embarked on a mission: to create a soundproof haven, a serene oasis amidst the delightful chaos of my household.
So, armed with some AI-powered insight, let’s venture into the realm of crafting our very own soundproof haven. Here’s the scoop on what I’ve unraveled.
1. Setting the Dimensions
I propose that we kick off our adventure by building a strong base, quite literally. It all starts with determining the size of your soundproof sanctuary.
Dimensional Deliberations
When envisioning your soundproof booth, it’s crucial to start with the right measurements. The dimensions of your booth will significantly impact its comfort, usability, and effectiveness. For a two-person setup, a recommended starting point is approximately 4 feet in width, 4 feet in depth, and 6.5 feet in height. This size offers ample room for two individuals to work comfortably without feeling confined.
Of course, these dimensions can be adapted to suit your specific needs and the available space in your home. If you have a bit more room to spare, consider increasing the dimensions slightly to enhance comfort. On the other hand, if space is a constraint, you can adjust the dimensions while maintaining the essence of a functional workspace.
Getting the dimensions right ensures that you have enough space to accommodate furniture, equipment, and individuals comfortably. It also helps prevent the booth from feeling cramped, fostering a conducive atmosphere for work or creativity. Whether you’re aiming for a cozy writer’s den or a compact recording studio, the right dimensions lay the groundwork for a successful DIY soundproof booth project.
Tailoring to Your Space
Before you embark on building your soundproof booth, take a careful look at the available space in your home. Measure the area where you intend to set up the booth and take note of any potential obstacles or constraints. This step will guide you in making informed decisions about the dimensions of your booth.
Remember, the journey towards crafting your soundproof haven begins with a tape measure and an understanding of your space. With the right dimensions in place, you’re ready to move on to the next step of building a soundproof booth that reflects your needs, aspirations, and creative endeavors. So, grab that tape measure and start sketching out the blueprint of your personal oasis of peace and productivity.
2. The Bottom Base
The bottom base of a soundproof booth serves as the foundation upon which your entire sanctuary rests. It’s like the sturdy ground upon which a grand castle is built – a crucial element that ensures stability and functionality. But do you really need it for your soundproof booth? The answer lies in your specific needs and the environment you’re working in.
The Case for a Bottom Base
Including a bottom base in your soundproof booth offers several advantages:
- Enhanced Stability: A bottom base provides structural stability to your booth. It prevents wobbling, shaking, or shifting, ensuring that your booth remains sturdy and secure.
- Reduced Sound Leakage: Sound has a sneaky way of finding its way out through any gaps or openings. A bottom base helps seal the booth from below, reducing the risk of sound leakage through the floor.
- Improved Sound Isolation: If your workspace is located on a higher floor or in an area with echo-prone surfaces, a bottom base can contribute to better sound isolation by minimizing vibrations and external noises.
- Additional Soundproofing: By adding soundproofing materials to the bottom base, you can further enhance the booth’s ability to absorb and block sound.
When a Bottom Base Might Not Be Necessary
However, there are scenarios where you might consider skipping the bottom base:
- Limited Space: If you’re working with limited space, a bottom base can take up valuable room. In such cases, you can explore alternative methods to ensure stability.
- Temporary Setup: If you’re planning a temporary soundproof booth setup, a bottom base might be an unnecessary addition. Instead, focus on the other elements that contribute to soundproofing.
- Existing Stable Surface: If your chosen location already features a stable and solid surface, you might find that a bottom base is redundant.
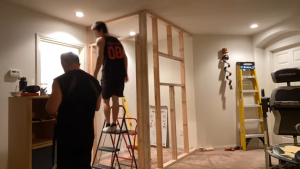
3. Framing and Structure
As you delve deeper into the construction of your soundproof booth, you’ll find that creating the frame and structure is like giving your sanctuary its skeleton – a strong foundation upon which everything else rests. Let’s explore the fundamental steps of framing and structuring your DIY soundproof booth, keeping it simple yet robust.
Before you roll up your sleeves, gather the necessary tools and materials:
- Wood studs (2x4s): These will serve as the building blocks for your booth’s frame.
- Plywood sheets: The walls of your booth will be constructed using sturdy plywood sheets, providing a reliable base for soundproofing layers.
Crafting the Framework
- Measure and Plan: Begin by measuring the dimensions you determined in the earlier planning stages. Mark the locations for the vertical wood studs (2x4s) that will form the corners and support the walls.
- Cutting and Assembling: With your measurements in hand, cut the wood studs to the appropriate lengths. Assemble the vertical studs along the marked lines, ensuring they are plumb and level.
- Adding Horizontal Studs: To create the top and bottom plates of the frame, add horizontal wood studs between the vertical ones. These will provide stability and support to the booth’s walls.
Creating the Wall Structure
- Attaching Plywood Sheets: Once the frame is in place, it’s time to add the plywood sheets that will become the walls of your booth. Secure the plywood sheets to the frame using screws or nails. Ensure the sheets are flush against the studs for a sturdy attachment.
- Double-Wall Construction: For enhanced soundproofing, consider a double-wall construction. This involves adding an additional layer of plywood with a layer of soundproofing material sandwiched in between.
Why Wood Studs and Plywood?
Wood studs (2x4s) are chosen for their strength and stability, providing a reliable framework for your soundproof booth. Plywood sheets offer a solid surface for soundproofing layers and ensure that your booth’s structure is durable and long-lasting.
Framing and structuring your soundproof booth is a straightforward yet essential step in the construction process. It’s about building the bones that will support the layers of soundproofing materials and create the overall form of your booth. With the framework in place, you’re ready to move on to the next phases of crafting your very own haven of tranquility and productivity.
4. Insulating Your Oasis
As we take this journey forward, building our very own DIY soundproof booth, it’s like weaving a cocoon of calmness in the midst of my bustling household. You see, this isn’t just about creating any old booth – it’s about crafting a space that truly serves its purpose. Without the magic touch of soundproofing, my little haven might just remain a plain old box. So, let’s unravel the importance of soundproofing and how it’s the key to turning this project into a haven of serenity.
The Science of Silence
Picture insulation foam as your trusty ally in the battle against sound waves. Its mission? To soak up and muffle those audio ripples, preventing them from bouncing around and causing a ruckus in your auditory sanctuary. By lining your booth’s interior walls with this specially crafted foam, you’re essentially building a fortress that keeps echoes in check and guarantees your space remains acoustically balanced. It’s like wrapping your booth in a cozy cocoon that muffles external noise and allows you to focus on what matters most.
Adding a Layer of Defense with Acoustic Panels
Think of acoustic foam panels or sound-absorbing blankets as the stylish armor that shields your booth from intruding sounds. These materials are designed to take soundproofing to the next level, by further taming echoes and sealing any potential gaps where noise might escape. It’s as if you’re dressing your booth in a suit of armor that repels unwanted auditory invaders, leaving you with a space that feels like an oasis of tranquility.
Affixing insulation foam and acoustic panels requires a bit of craftsmanship and strategy. Each foam panel or blanket serves as a puzzle piece that contributes to the overall soundproofing masterpiece. The way you meticulously place them determines the extent to which your booth will truly be a realm of undisturbed creativity. As you work on this step, you’re essentially orchestrating a symphony of silence, using every piece to compose an environment that resonates with your desire for tranquility.
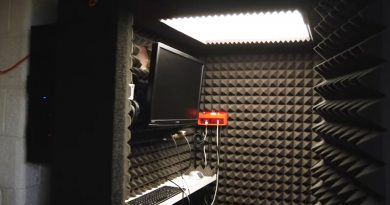
5. Elevating Soundproofing with Acoustic Panels
Now, let’s delve into a crucial step that can significantly enhance the soundproofing of your booth: adding acoustic panels. These panels are like the unsung heroes of tranquility, absorbing sound waves and preventing them from bouncing around and causing disturbances. By incorporating these acoustic wonders onto your booth’s interior walls, you’re taking a pivotal stride towards creating an environment that’s harmoniously hushed and tailor-made for focused endeavors.
Materials Needed:
- Acoustic panels (available in various sizes and designs)
- Adhesive (ensure it’s suitable for your booth’s material)
- Mounting hardware (such as brackets or hooks)
- Tape measure and level
Instructions:
- Measure and Assess: Begin by measuring the dimensions of your booth’s interior walls to determine how many acoustic panels you’ll require. Gauge the optimal spots for placement to maximize their sound-absorbing potential.
- Choose Acoustic Panels: Embrace the creative process by selecting acoustic panels that not only align with your budget but also resonate with your visual preferences. With diverse sizes, colors, and designs available, you can curate a booth aesthetic that’s uniquely yours.
- Apply Adhesive: Follow the manufacturer’s instructions to apply adhesive to the back of each acoustic panel. Opt for an adhesive that’s compatible with your booth’s wall material, ensuring a strong and lasting bond.
- Mount Acoustic Panels: Gently press the adhesive-coated side of each acoustic panel onto the wall, maintaining alignment and levelness. Hold them in place for a brief moment to allow the adhesive to create a steadfast connection.
- Repeat the Process: Extend the benefits of acoustic bliss by repeating the installation process for all selected panels. Pay special attention to corners and areas prone to sound reflections, ensuring comprehensive coverage.
- Allow Time to Settle: Grant the adhesive ample time to dry and cure in accordance with the manufacturer’s recommendations before enjoying your revamped acoustic haven.
Why We Chose Soundproofing Panels?
On the internet, you might come across videos where people use blankets to soundproof their little booths. But why did we opt for panels instead? Let’s take a closer look and uncover why these panels are our top choice for creating a peaceful oasis of quiet.
Imagine you’re building a little quiet haven, like a cozy room within a room. To keep the noise out and make it soundproof, you need to pick the right materials. When it comes to what goes on the walls, think of it like this: there are different options, but we’re going for the best one.
So, why go for those special panels instead of using blankets, for example? Well, those panels are like superheroes for sound. They’re specially designed to grab onto sounds and make them disappear. They’re like your quiet guardians. They’re made in a way that they’re really good at absorbing all kinds of sounds, like talking, music, or even background noise. Unlike blankets, which might not work as well, these panels are like expert sound absorbers. They’re also pretty good-looking, so they’ll fit right in with your quiet space.
And not to mention, they’re tough cookies. They’re built to last a long time, so you won’t have to worry about them wearing out quickly. Plus, they’re pretty easy to put up on your walls, so you don’t need to be a DIY expert to make it happen.
6. Electrical Maze: Ventilation and Outlets
“I’m not well-versed in electrical work, so how can I tackle this aspect?” you might be wondering. Fear not, for we’ve got you covered as we delve into the crucial realm of ventilation and electrical outlets within your soundproof booth.
Creating a Breathable Oasis: Ventilation
Good ventilation is key to maintaining a comfortable and productive workspace. While you might not be an electrical expert, ensuring proper air circulation in your booth doesn’t have to be a daunting task. Start by identifying a suitable location within your booth to install a small ventilation fan. These fans are typically easy to install, requiring basic wiring skills. You’ll need to channel the power source to the fan through a power outlet, but worry not – we’ll cover that shortly.
Position the fan in a way that promotes air exchange without interfering with the booth’s soundproofing. This strategic placement will help prevent stuffiness and create a refreshing ambiance. Remember, a well-ventilated booth keeps your focus sharp and your creativity flowing.
Empowering Your Workspace: Electrical Outlets
Now, let’s address the elephant in the room: electrical outlets. While you might not be an “electric woman,” tackling this aspect is more manageable than you might think. Consider your booth’s layout and determine where you’ll need power sources. Whether it’s for charging devices, plugging in essential equipment, or illuminating your sanctuary, having convenient outlets is crucial.
If you’re not comfortable with intricate wiring, fear not – you can opt for plug-in power strips. These strips come with multiple outlets and can be easily positioned around your booth, offering flexibility without the hassle of wiring. Additionally, if you’re keen on a permanent solution, enlisting the help of an electrician ensures a safe and reliable power setup.
Incorporating both ventilation and electrical outlets ensures a well-rounded, functional, and comfortable space within your soundproof booth. Remember, while you might not be an expert in electrical matters, a little guidance goes a long way in creating the perfect environment for your needs. So, let’s breathe fresh air into your booth and keep those devices powered up for a productive and satisfying work experience.
7. The Final Touch: Making Your Soundproof Booth Flawless
Now that you’ve navigated the intricate steps of constructing your own soundproof booth, it’s time to ensure everything comes together seamlessly. As you near the finish line, remember this crucial step: quality control.
Carefully inspect your booth for any gaps, openings, or loose components. Assemble each part with precision, paying close attention to corners, joints, and seams. Your goal is to create a cocoon of tranquility – a space where sound is hushed and concentration thrives. Check that the insulation foam, acoustic panels, and other materials are securely in place. Ensure the electrical outlets, lighting fixtures, and ventilation systems are functioning as intended. Run your hand along the walls, feeling for any irregularities or gaps that could compromise the soundproofing.
Consider performing a sound test by entering the booth and closing the door. Listen for any external noises seeping in and evaluate the overall sound insulation. If you notice any issues, take the time to address them before considering your booth complete.
Remember, attention to detail is your greatest ally in creating a flawless soundproof booth. By following each step meticulously and being vigilant in your inspection, you’ll transform your DIY project into a haven of quietude and focus. So, let’s take that final step together, ensuring your booth is a sanctuary where productivity reigns and disturbances are silenced.
In Conclusion
And if you still prefer to witness the entire process firsthand, you can always turn to online video tutorials for guidance. For instance, you might find inspiration from resources like this one, where DIY enthusiasts share their experiences and tips.
Video: The Ultimate Soundproof Workshop Studio Office
Embracing the world of soundproofing your personal haven opens up a realm of creativity and tranquility, and with a little dedication and know-how, you’ll have a space that not only blocks out the noise but also elevates your surroundings to new heights of serenity.